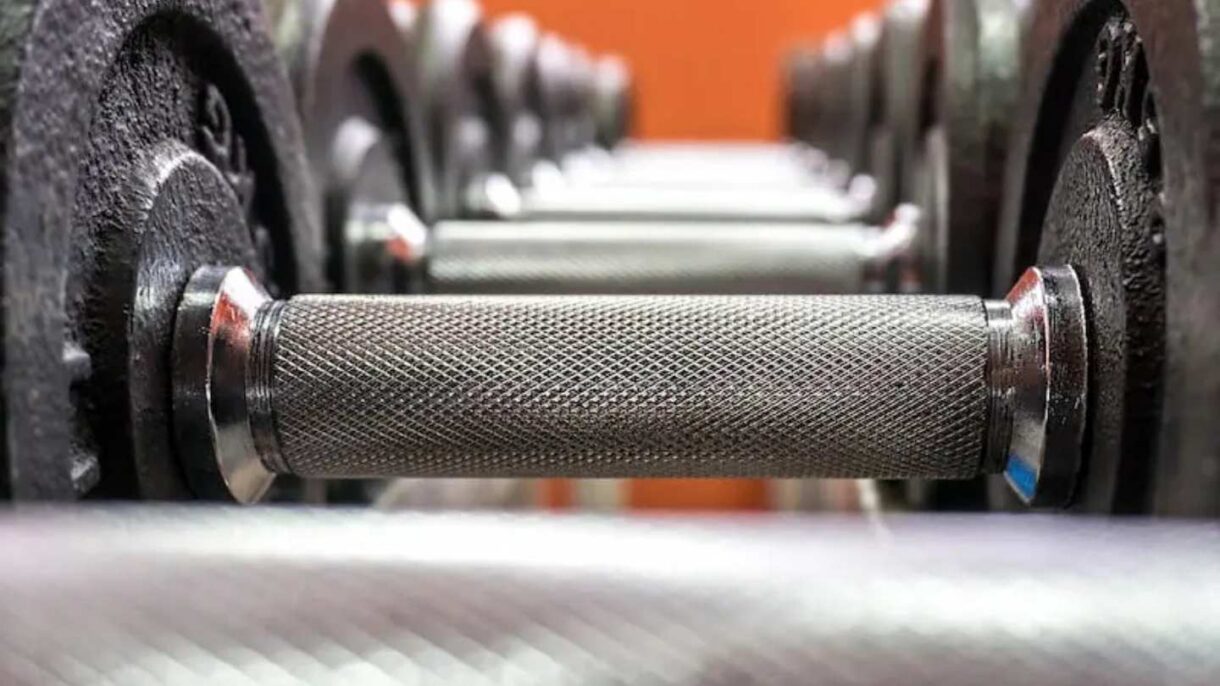
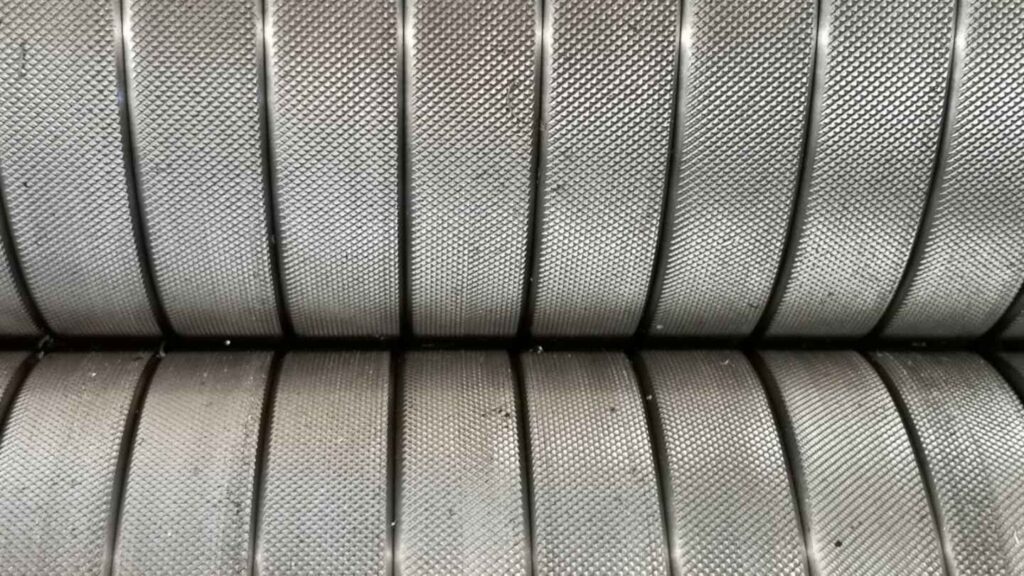
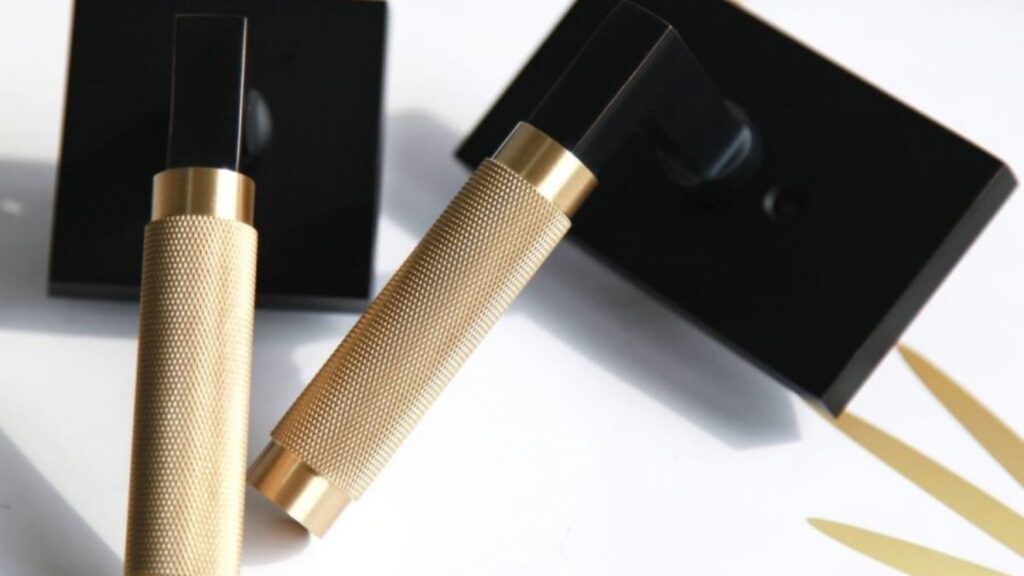
CNC knurling forms a textured pattern on a part's surface. It improves grip, adds a professional finish, and supports functional use in high-touch components. You often see it on knobs, handles, and tool surfaces that require a secure hold.
Unlike cutting or engraving, knurling uses pressure. A knurling tool rolls against the spinning part and displaces the material. This creates a clean, repeatable pattern without removing any metal. CNC machines ensure consistent results, even on tight-tolerance or high-volume runs.
You gain both function and appearance without sacrificing material strength. The process works best on softer metals like aluminum, brass, and mild steel. For engineers and machinists, it’s a simple way to boost usability while maintaining tight control over quality.
CNC knurling machining forms a raised pattern on round metal parts. It improves grip and adds a controlled surface finish. You often use it on knobs, handles, or tools that need better hand contact.
The process does not cut the metal. Instead, a hardened roller tool presses into the surface as the part rotates. This forms the pattern by displacing material. CNC machines keep the pressure, feed, and alignment consistent.
You get a clean, repeatable texture without removing any material. The result is strong, accurate, and reliable. CNC knurling is ideal when you need both function and a finished look.
CNC Knurling Process
CNC knurling imparts a surface pattern through the use of pressure. Every step has to be correct and reproducible. You get to have clean results with control of feed, pressure, and alignment.
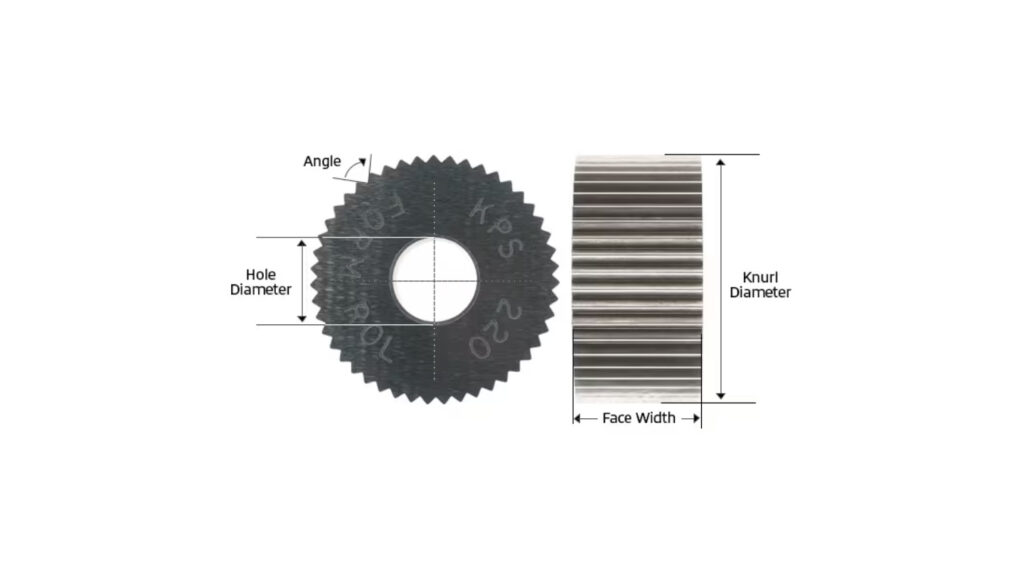
The pattern type and pitch are the determining factors of the choice of tool. The most frequent ones are straight, diamond, and diagonal. Your tool should fit your part diameter and material.
Have a rigid holder and little overhang. This eliminates contact deflection. Make sure that the tool is adjusted to your machine turret or toolpost.
Select a good tool available from reputable vendors. Poor surface finish is caused by varying tools. Use hardened steel wheels repeatedly.
Firmly insert the part in the chuck or collet. The right amount of pressure on the jaw should be used to prevent slipping off the part. It has to be smooth and clean before forming.
Put the knurling tool in the centerline of the part. The pattern skips or double-tracking is caused by misalignment. Maintenance of everything square to prevent damage to parts.
Before the knurl, add a little chamfer. This assists the tool in coming into contact. Sharp edges: they lead to a high rate of tool wear and noise.
Gradually, the saddle speed is maintained at a moderate speed of about one hundred to two hundred SFM. The speed is high, which raises heat and spoils the pattern. At lower speeds, you have better control of the surface.
The feeds should correspond to the tool pitch. Misfeeding results in tearing or overlapping. To obtain a uniform pattern, use constant feed.
Be careful when you raise the pressure of control. Excessive force distorts the part. Not enough is going to make a complete knurl.
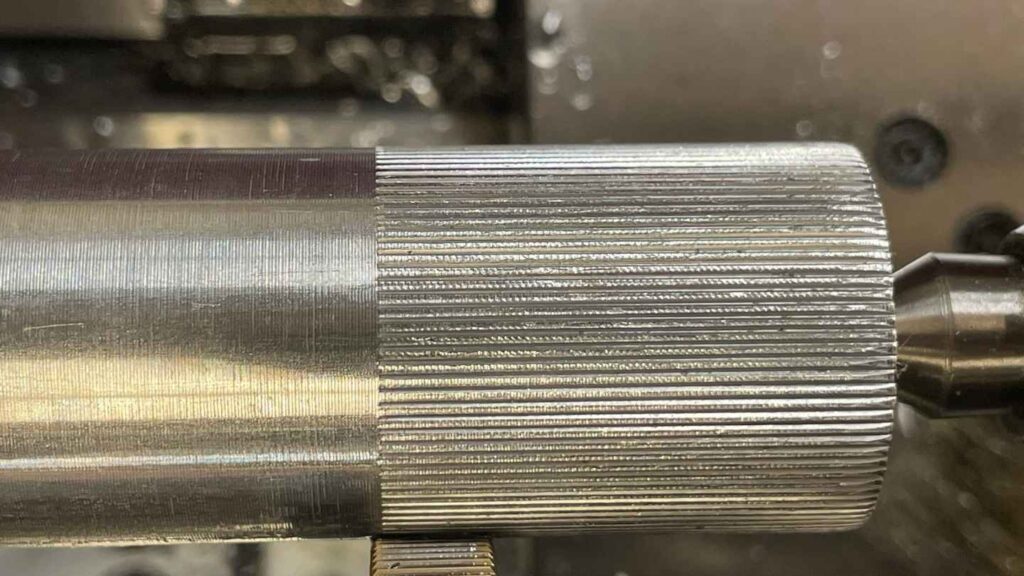
Make a steady start on knurl pass. Do not drag, but rather roll the wheel. Coolant should be applied to lower the heat and increase the life of the tool.
Once the pass is completed, inspect the pattern. Seek in them clean, complete impressions free of doubling. One should use a gauge in case the accuracy of pitch is necessary.
Do the same run again. Inspect a test piece in several cycles. There should be consistency in production work.
The knurling patterns are used to perform functions as well as aesthetics. The type is selected based on the use of the parts, material, and design requirements. All the patterns influence grip, abrasion, and texture.
Straight Knurled Pattern
Straight knurling provides lines on the part surface vertically. It is most suitable for the parts that move by hand, say, knobs or rollers. The pattern has good axial grip devoid of side friction.
This kind can be machined more easily in most of the setups. It cleanly forms on soft metals, such as brass and aluminum. Press-fit applications are also assisted using straight knurls.
This should be used where rotation is a component of the design. It provides the same grip that does not lock out fingers. It is also simple to check as far as quality is concerned.
Stainless Steel Diamond Knurling
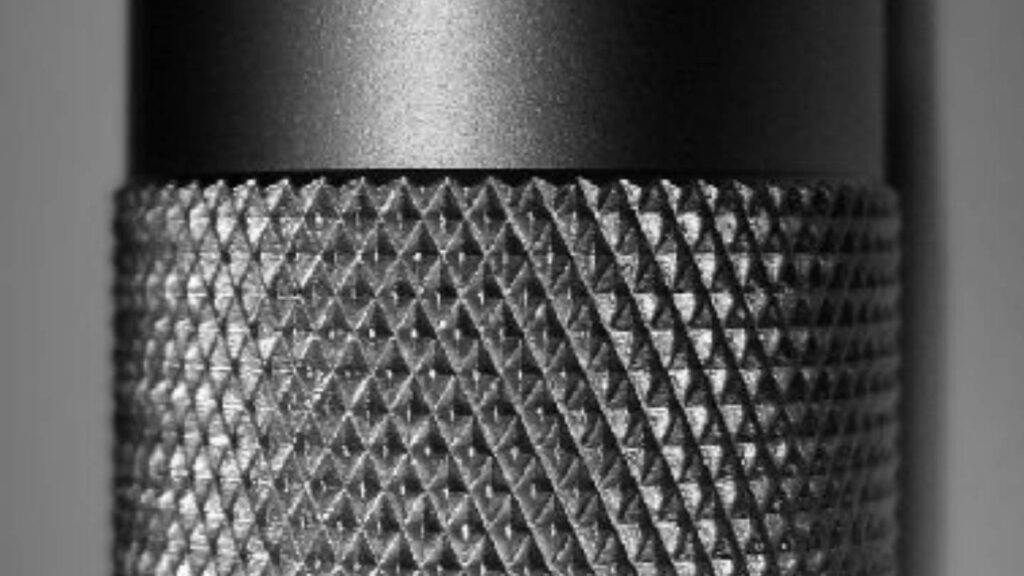
The knurling of the diamond creates cross and cross lines. The pattern resembles a train of raised diamonds. It provides outstanding traction in all directions.
This is the knurling type, by far the most common. You find it on handle tools, adjusting knobs, and mechanical grips. It is functional and also has a finished appearance.
Apply diamond knurling where there is a need for high grip. It is durable to use and wash. It is perfect to use on hand tools or open surfaces.
Diagonal Knurling
Diagonal knurling is cut at a definite angle, most often to the left or the right. It provides a technical directional grip look. The style is not as aggressive as the diamond.
It is beneficial in areas where there is no need to have traction. You can commonly find it on ornamental or lightweight parts. Diagonal marks also eliminate build-up in an oily setting.
This should be selected when looks are more important than the strength of grip. It is simpler to clean and check. It is just necessary to ensure that the direction of the pattern will be according to your design spec.
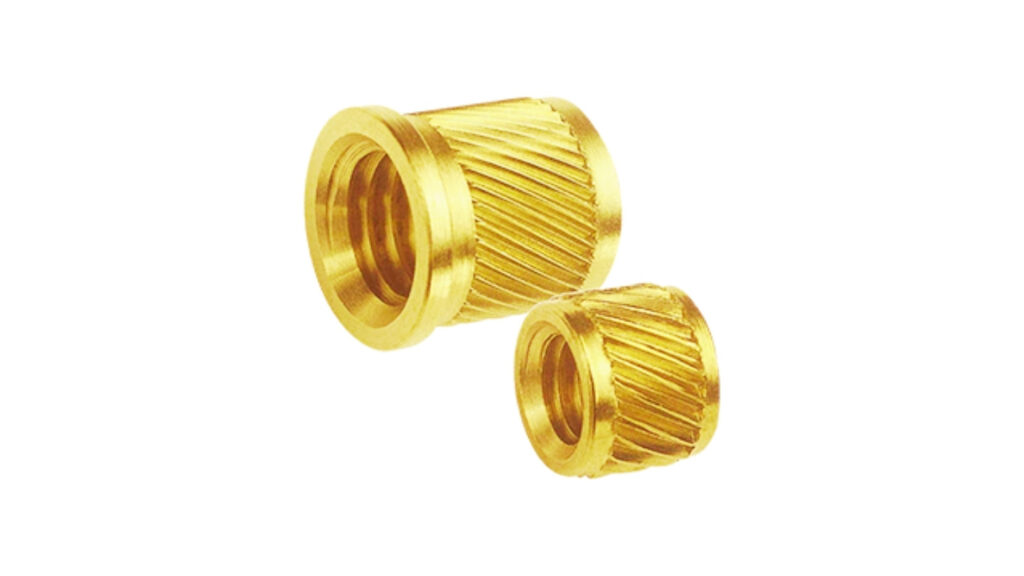
Helical Knurled Inserts
A helical knurling makes a continuous spiral on the surface. It is applied in those parts that rotate during use. The pattern has the effect of decreasing stress when travelling at high speeds.
This kind enhances the grip without rough contact. It applies to rollers, drive shafts, or dials of control. The sloping structure assists in removing the rubbish and oil.
Helical patterns need exact feed and orientation. And utilize matched left-hand and right-hand tools where required. This prevents mis-cut or overlapping.
Other applications employ non-standard, or multi-start knurls. These are non-standard patterns having special spaces or shapes. They are popular in the branding, indexing, or locking features.
The matched tools and custom feeds are needed in custom patterns. To keep the form dimensions, the pressure of the tools should be changed. CNC control aids in controlling the fine adjustments.
Use this kind when appearance or fit is essential. It is fine with logos, working textures, or keyed surfaces. Design changes to the plan tools and checking processes.
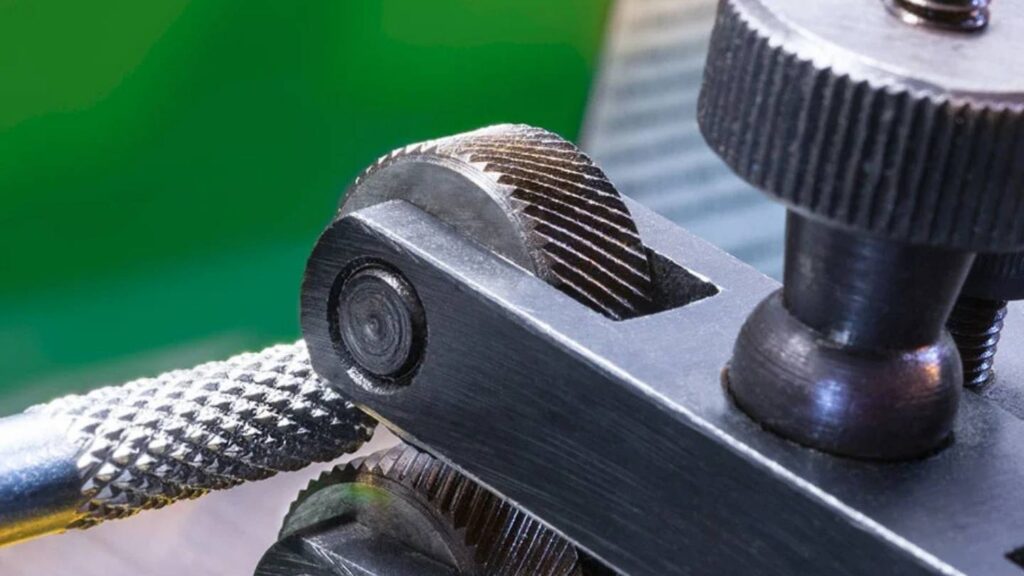
Precise knurling requires the right choice of the tool. The proper tool enhances the quality of the surface, the life of the tool, and process dependability. Take note of the material, type of pattern, tool holder, and machine matching for compatibility.
Knurling tools are generally of hardened steel. More difficult materials demand better wear resistance, and this is achieved with carbide-tipped wheels. Select tool hardness depending on the workpiece to prevent too early wear out.
When a softer tool is used on hard metals, it gets sharp very quickly. A hard tool, when used on soft metal, may result in surface galling. The hardness of match tools and coatings should be matched to the application.
Choose a tool of the right type of pattern: straight, diamond, diagonal, or custom. The pitch should be the same as the part diameter and feed rate. A mistake in pitch results in the overlap of patterns or distortion.
The CNC programs ought to match the wind speed with the pitch of the tool. In the case of the multi-start or custom patterns, ensure that tools are compatible with the machine tooling options. The right pitch keeps a pattern clear and grippy.
Put a hard holder made to take knurling tools. Overhang should be kept to a minimum to minimize deflection and vibration. The deflection causes irregular patterns and wear of tools.
Make sure that the tool holder fits your CNC turret or toolpost firmly. Look at backlash or slackness before commencing. Surface finish is maintained when the proper holders are set up.
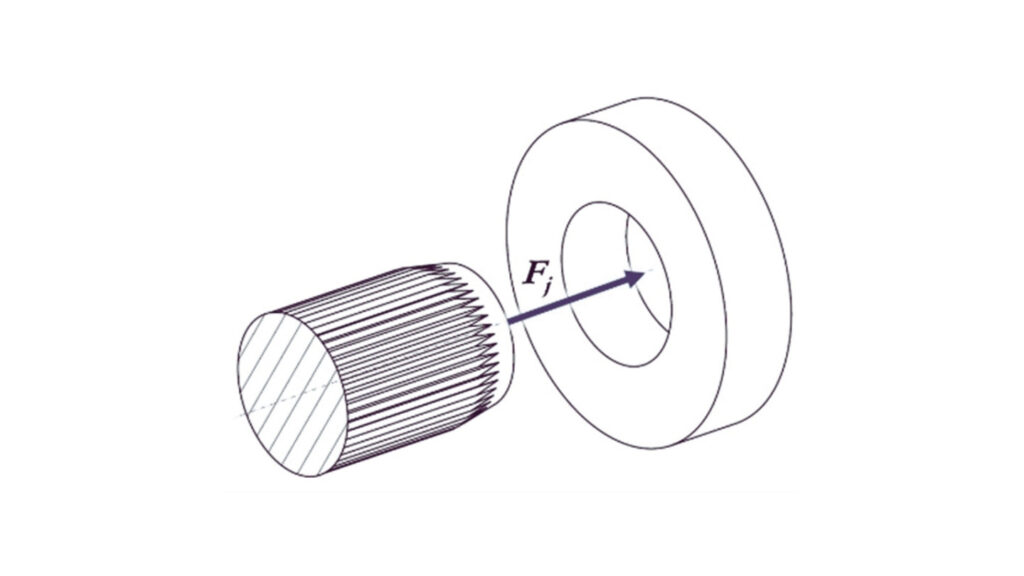
This should position the knurling tool with precision on the part centerline. Misalignment leads to the formation of a double track or part of the pattern. Take dial indicators or the laser alignment tools when they are available.
Place the radial position of the tool with care. The knurling wheel is supposed to be in touch with a part that does not require a hard contact. Correct positioning helps avoid damage and imperfection.
Knurling wheels should be periodically checked to see their state. Rough and uneven tools produce rough shapes and induce more scraps. Change tools when the quality of surfaces becomes poor.
Wash the tool after use to get rid of the debris and the buildup of metal. Also, the moving parts on adjustable holders should be lubricated to ensure easy operation. A tool that is well-maintained increases machine uptime.
Knurling can provide appropriate value to a part through effective design that does not affect the functionality of the part. Early in the process, consider pattern type, part geometry, material, and tolerances. Effective planning eliminates flaws and corrections.
Before knurling, decide what surface finish you require. The patterns are deep, which enhances a good grip, but the surfaces become rough. Shallow patterns appear to be cleaner and have less traction.
Make a balance between the need for grip and beauty. Provide the design maximum permissible pattern depth. This will aid the machinist in adjusting the appropriate pressure and tool.
Knurls Technical Information
Make the knurl pitch a match with your part diameter. Mistakes in the pitch lead to irregular patterns or the doubling up of the tracking. To compute proper pitch, use pitch formulas or supplier charts.
Square up the parts' diameter a little. Knurl consistency and appearance can be improved by small changes.
Select materials that knurl easily, such as aluminum, brass, and mild steel. More brittle or hard materials may crack or chip under the pressure of being knurled.
In the case of hard alloys, alternative surface treatment is to be considered. You might require special processes or equipment in order to obtain desired outcomes.
Chamfer or radius part edges. Pattern distortion takes place as a result of sharp edges giving the tool chatter. Transitions are better, which leads to better tool engagement and patterns.
Knurling should not be very near edges or features. Give a space of level area for the tool to roll over.
Geometry and material reversion of knurled interference fit
Include dimensional changes because of knurling. The process makes the part diameter increase slightly. Add tolerance bands that will take this growth into account.
Knurling can be followed by planning secondary operations. Knurled surfaces should not be machined because this will destroy the texture. When polishing or coating is required, test compatibility is the first thing to be done.
CNC knurling has a lot of advantages in terms of use and design. It assists the parts to work better, and it makes them look good. These are the key benefits to take into consideration.
Well Gripped Knurled Parts
Knurling causes a patterned surface so as to avoid slipping. It makes knobs and handles easy to handle. This lessens fatigue to the user and enhances control when in use.
Diamond patterns offer traction on all planes. This is to guarantee you a tight grip, even on wet and oily surfaces.
Knurling does not cut the pattern into metal but rather pushes it into the metal. This implies that the portion will not get weak. No materials are lost, and there is no danger of cracking.
It also makes your workplace cleaner since it prevents metal chips. This implies fewer tool wear and stoppages of machines.
CNC machines produce identical patterns on every part. This uniformity implies that your parts are the same in terms of appeal and texture, even in big runs. You produce less waste and rework.
That is time-saving and cost-saving as well as quality maintenance.
Knurling equipment is easy to mount and to regulate. After setting the right pitch and the nourishment, the machine operates well. It suits automated production with little or no downtime.
It is a fast pace that enables you to achieve deadlines without cutting corners.
Knurling applies to aluminum, brass, and mild steel, among others. The patterns dealt with by the process may be straight, diamond, diagonal, or custom. This makes it both flexible in terms of use and design.
While CNC knurling has many benefits, it also comes with some limitations. Knowing these helps you decide when knurling is the right choice.
Knurling is ideal on lower hardness metals such as aluminum and brass. Crack or chip out may occur in hard or brittle materials. This makes your knurling opportunities restricted.
When knurling is used, the material is displaced, and so the diameter is slightly enlarged. This may influence tight tolerance assemblies or fits. This change has to be taken into consideration during the design.
With heavy use or friction, the raised knurling pattern may wear off. This loses strength and may even need reworking or replacement. It is not as long-lasting as certain coatings or surface treatments.
Knurling is applied to round and even surfaces. Areas that have complex, flat, or sharp edges can be knurled easily. Access to tools and even maintenance of pressure becomes difficult.
Knurling needs delicate alignment of tools and parts. The poor pattern quality or damage on the surface of the pattern due to misalignment is caused by a side effect of low-quality appearance patterns or the surface of the pattern. This may raise the rates of scrap and machine plant shutdown.
CNC knurling is a reliable way to add grip and texture to round parts. It works best when you choose the right tool and set up the machine carefully. While it has some limits, like material hardness and size changes, knurling can improve part function without extra machining. When planned well, it saves time and delivers consistent, high-quality results that help your products perform better.
What materials can I knurl using CNC?
You can knurl most softer metals like aluminum, brass, and mild steel. Hard or brittle materials may crack or chip, so they require special consideration or alternative methods.
Can CNC knurling affect part dimensions?
Yes, knurling slightly increases the part’s diameter by displacing material. You should account for this change in your design and tolerances.
How do I prevent pattern distortion during knurling?
Ensure the tool aligns perfectly with the part centerline. Maintain steady pressure and feed rates. Proper setup and rigid tooling reduce distortion risks.
Is knurling suitable for all shapes?
No, knurling works best on cylindrical, uniform surfaces. Flat or complex shapes can cause tool access and pressure problems, leading to poor patterns.

Aluminum Heat Sinks: Process, Techniques & Applications

Aluminum Car Parts: Benefits, Techniques, and How to Source

CNC Medical Machining: Process, Techniques & Applications

Complete Automotive Machining Guide: From Discontinued Parts to Custom Solutions
Custom Automotive Parts: Methods, Challenges & Choosing the Right Manufacturer
What Is a Vacuum Casting Service? Techniques, Process, & Applications